
Local Development 🚧
This is developer setup guidance, not a production installation procedure. It describes two approaches for local development:
- Local Frontend Development – A streamlined setup for frontend-only work, using hot-reload and connecting to a remote orchestrator instance.
- Local Full Stack Development – A complete local environment with WildFly and MySQL for full orchestrator development.
Local Frontend Development
Section titled “Local Frontend Development”This approach is for developers that are only modifying or working on the frontend TypeScript code. This simplifies the deployment process and eases local requirements by not needing to set up local application servers and databases.
Requirements
Section titled “Requirements”- Node.js 24+ and NPM 11+.
- Access to a running remote SENSE Orchestrator instance.
Quick Start Steps
Section titled “Quick Start Steps”- Clone the repository:
Terminal window git clone https://github.com/esnet/StackV.git - Navigate to the webapp folder:
Terminal window cd StackV/StackV-web/src/main/webapp - Create a minimal
.envfile with the Keycloak server URL:PORTAL_KC_URL=https://kc.example.com - Install dependencies and start the development server:
Terminal window npm installnpm start - Use the standalone modal to connect to a remote orchestrator instance.

Click the connection manager button to open the connection modal...
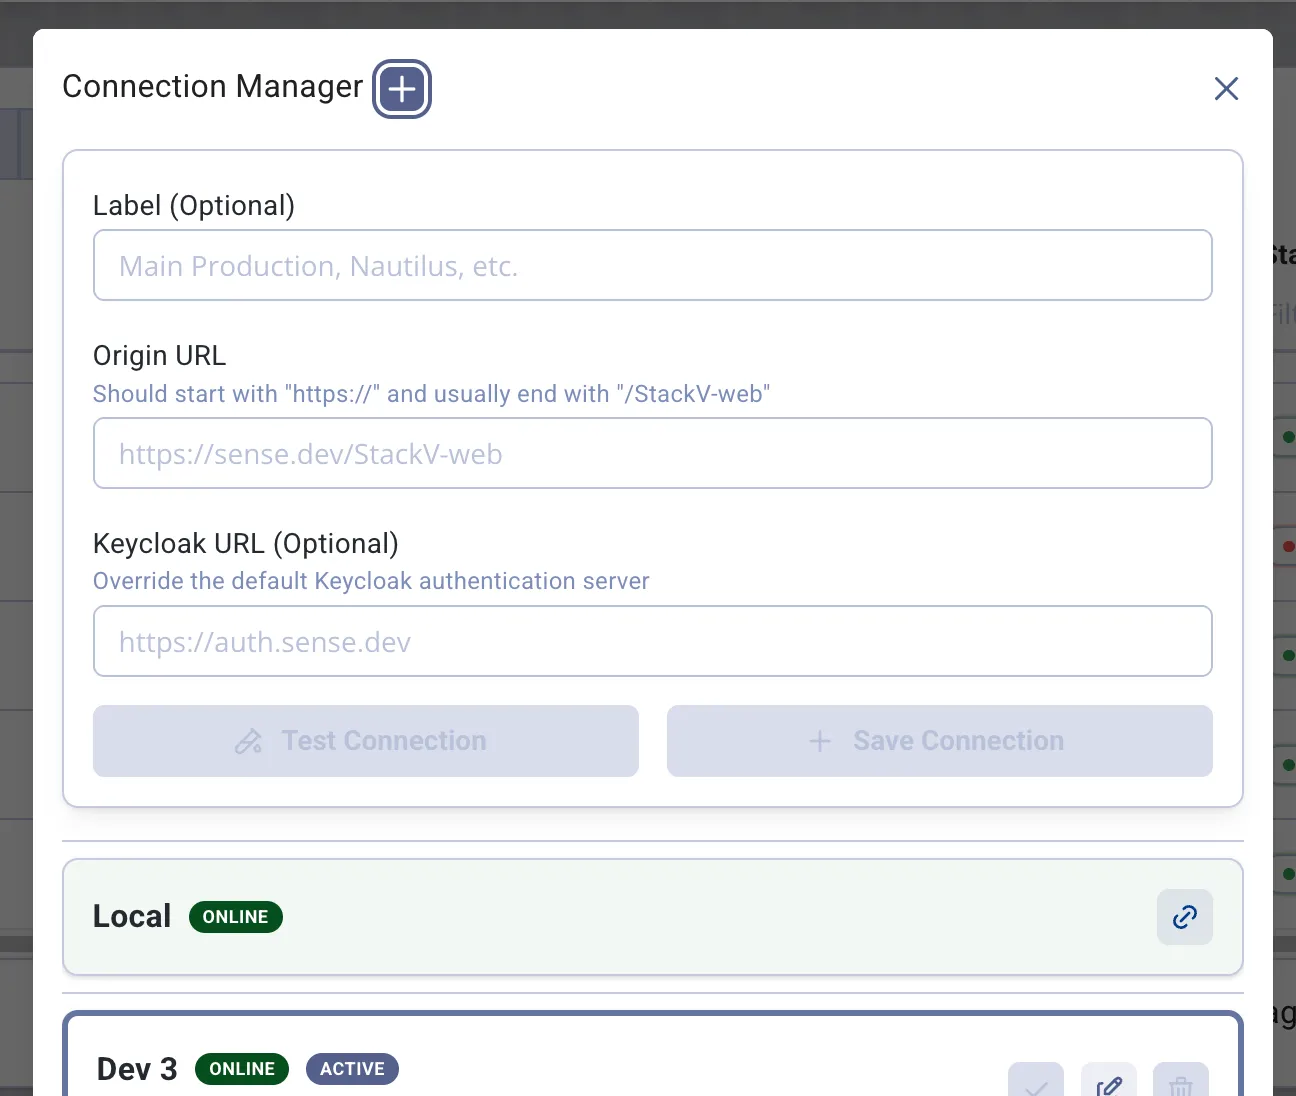
Save the orchestrator URL as a connection, then connect to it...
Local Full Stack Development
Section titled “Local Full Stack Development”This approach provides a complete local development environment with the SENSE orchestrator deployed on top of WildFly and connecting to a local SQL database.
This is intended for active developers who wish to contribute to backend components, work on the full stack, or have specific deployment needs.
Requirements
Section titled “Requirements”- An accessible MySQL 9.7 server, either via docker service or direct install.
- A configured WildFly 38 server installation.
- If building from source, a number of build tools: JDK 21, Maven 3.9+, Node.js 24+, and NPM 11+.
Environmental Variables
Section titled “Environmental Variables”To start, you’ll want to copy the env.example file to .env and edit it to your needs. Of note are the
DB_ROOT_PASSWORD and KC_SECRET variables, which are required changes for the orchestrator to properly run. Some
fields may not be applicable to this operations mode, but everything else may be adjusted depending on your needs and
environment.
For workflows using stored tokens, also configure the credential store. Its
SENSE_CRED_* variables must reach the process that starts WildFly; a frontend .env file or a build-time setting does
not supply them to the running server. Key-file paths must be readable by that WildFly process. Keep key material out
of system.properties and the EAR, and restart the application after changing its key configuration.
Setting Up the Database Server
Section titled “Setting Up the Database Server”The simplest way to approach this is the use of our provided docker compose file at docker/mysql-docker-compose.yml.
The rest of this page assumes you are proceeding with this templated docker process, but you may also configure your own
MySQL server locally if you prefer; if so, you may want to copy over the db.cnf settings for your own installation.
Creating the Databases
Section titled “Creating the Databases”To stand up the MySQL container, you can run the following, assuming you are at the project root:
docker compose -f ./docker/mysql-docker-compose.yml up -dOnce the MySQL container is running, you can proceed to set up the user privileges.
Setting Up User Privileges (Optional)
Section titled “Setting Up User Privileges (Optional)”The native configurator uses the MySQL root user for all local datasource templates. Set DB_PASS to the same value
as the Compose service’s DB_ROOT_PASSWORD. No source-backed native configuration input changes the application
database username. This procedure is for local development only; do not extrapolate it to production.
Initializing the Schema
Section titled “Initializing the Schema”The next step is to initialize the schema. Our application uses Flyway to manage the database schema. You can initialize
the schema using Flyway directly (with the migrations located at db/migrations) or by using the provided
migrate-docker.sh script.
Wait for the MySQL service health check to report healthy before invoking Flyway. Assuming you’re still in the project
root, run the below command, noting you will need the DB root password in your shell environment:
FLYWAY_HOST=host.docker.internal FLYWAY_PORT=3309 FLYWAY_PASSWORD="$DB_ROOT_PASSWORD" ./db/migrate-docker.shEdit FLYWAY_HOST, FLYWAY_PORT, and FLYWAY_PASSWORD if required. Note that the migration only affects our main
rainsdb database. The frontend database uses create-if-absent via JDBC, and the orchestrator will populate the stable
log schemas at boot.
Use the migration set from the matching application revision. Credential-store support requires
db/migrations/rainsdb/V4__sense_cred.sql; apply it through the existing Flyway flow rather than creating sense_cred
by hand or depending on Hibernate’s schema update.
Building the Orchestrator
Section titled “Building the Orchestrator”If you have been provided a copy of the orchestrator artifact, you may skip this step. Otherwise, you will need to build the orchestrator from source. The build process consists of two stages:
1. Configure properties.
Section titled “1. Configure properties.”When building and running the orchestrator directly, you will need to manually adjust the Keycloak/OIDC configuration in place of the CI pipeline.
There are currently two files that need to be adjusted:
StackV-ejb/src/main/resources/system.propertiesStackV-web/src/main/webapp/.env
Each of these files has a default base URL for the Keycloak configuration, such as https://auth.dev3.virnao.com.
Before building, simply edit the URL (and any associated secrets in system.properties) to match your environmental
connection.
2. Build NPM Artifacts
Section titled “2. Build NPM Artifacts”First, we must set up and package the frontend assets:
cd /path/to/project/StackV-web/src/main/webappnpm installnpm run buildThis will install all Node.js dependencies and build the frontend application.
3. Build Maven Project
Section titled “3. Build Maven Project”Once the NPM artifacts are built, they will be packaged and ready to embed into the web module of the .ear. Now we can
build the Maven project:
cd /path/to/project/mvn clean install -DcreateChecksum=trueNote: The Maven build requires at least 3GB of heap memory. If you encounter memory issues, set the MAVEN_OPTS
environment variable:
export MAVEN_OPTS=-Xmx3Gmvn clean install -DcreateChecksum=trueThis will produce the .ear file in StackV-ear/target/StackV-ear-1.0-SNAPSHOT.ear.
Running the Orchestrator
Section titled “Running the Orchestrator”The orchestrator is distributed as a Jakarta EE .ear archive, and so naturally requires deployment onto a configured
WildFly application server.
WildFly Server Setup
Section titled “WildFly Server Setup”Before deploying the orchestrator, you need a configured WildFly 38 server. Contact a developer to obtain a preconfigured WildFly instance with all necessary data sources, security domains, and Jakarta EE configurations.
Once you have the preconfigured server, you may need to adjust certain settings for your local environment:
Adjusting Datasource Settings
Section titled “Adjusting Datasource Settings”The orchestrator requires a MySQL datasource connection. You’ll need to update the datasource configuration in your
WildFly standalone.xml configuration file (typically located at
$WILDFLY_HOME/standalone/configuration/standalone.xml).
Look for the <datasources> section and update the connection details:
<datasource jndi-name="java:jboss/datasources/YourDS" pool-name="YourDS"> <connection-url>jdbc:mysql://localhost:3306/your_database</connection-url> <driver>mysql</driver> <security> <user-name>your_username</user-name> <password>your_password</password> </security></datasource>For each datasource, update the connection-url, user-name, and password to connect to your local MySQL instance,
if needed.
Adjusting OIDC Settings
Section titled “Adjusting OIDC Settings”The orchestrator uses Keycloak for authentication via OIDC. You may need to update the Keycloak URL in the
standalone.xml configuration if it differs from what you were provided.
Look for the OIDC/Keycloak configuration section and update the provider URL to point to your Keycloak instance:
<auth-server-url>https://proper-keycloak-server:8443/auth</auth-server-url>Replace your-keycloak-server:8443 with your local or remote Keycloak server address.
Before using the jboss-cli.sh --connect deployment method below, you may want to start the configured server in a
separate terminal to verify it can boot cleanly:
/path/to/wildfly/bin/standalone.sh -c standalone-full.xmlDeploying to WildFly
Section titled “Deploying to WildFly”There are two methods to deploy the orchestrator to WildFly:
Method 1: Using WildFly CLI (Recommended)
Section titled “Method 1: Using WildFly CLI (Recommended)”Deploy the orchestrator .ear file using the WildFly CLI:
$WILDFLY_HOME/bin/jboss-cli.sh --connect --command="deploy /path/to/project/StackV-ear/target/StackV-ear-1.0-SNAPSHOT.ear --force"Replace $WILDFLY_HOME with your WildFly installation directory and /path/to/project with the path to your project
root.
Note: The --force flag will redeploy the application if it’s already deployed, which is useful during development.
Method 2: Copy to Deployments Folder
Section titled “Method 2: Copy to Deployments Folder”Alternatively, you can deploy by copying the .ear file directly to the WildFly deployments directory:
cp /path/to/project/StackV-ear/target/StackV-ear-1.0-SNAPSHOT.ear $WILDFLY_HOME/standalone/deployments/WildFly will automatically detect and deploy the application. This method is useful for automated deployments or when the CLI is not available.
With all of this in place, you can follow the WildFly server logs as it deploys, and should eventually be able to access
the orchestrator at http://localhost:8080/StackV-web/portal.
If you configured the credential store, open Admin Settings → Credentials as a SENSE System Admin. Confirm Store Active, the expected Key Version, any required previous keys marked LOADED, and no key or verification warnings. For failures, see credential-store diagnostics.
Troubleshooting
Section titled “Troubleshooting”Database Connection Issues
Section titled “Database Connection Issues”If the orchestrator fails to connect to the database, verify:
- The MySQL Compose service is running and its host port is correct.
DB_ROOT_PASSWORDwas set before the MySQL data volume was first initialized; changing it later does not update an existing volume.- The MySQL service health check reports
healthybefore Flyway is invoked. - The database secret matches across Compose (
DB_ROOT_PASSWORD), Flyway (FLYWAY_PASSWORD), and the configuration (DB_PASS). - WildFly’s
MysqlDS,FrontendDS, andLoggerDStest-connection-in-pooloperations each return success. - The application driver connection checks succeed after the server starts.
- The frontend application logs show
Frontend logging schema ready.and thelogandlog_archivedtables are present infrontend.
Deployment Failures
Section titled “Deployment Failures”If deployment fails, check the WildFly logs at $WILDFLY_HOME/standalone/log/server.log for error messages.